How Do You Seal Seams on Waterproof Fabric?
1st May, 2026
Waterproof fabric can still leak through stitched seams, even if the material itself repels water. Sewing creates tiny needle holes, so sealing those seams is often the step that turns a water-resistant project into something more practical for outdoor use.
Whether you are making rainwear, garden cushion covers, outdoor storage bags or protective covers, the right seam sealing method depends on the fabric, coating and how the finished item will be used.
Heavier materials such as our Waterproof Heavy Duty 600 Denier Canvas Fabric with PVC Backing are often easier to seam seal for outdoor covers, storage bags and hard-wearing garden projects because the fabric holds its shape well during sewing.
Some waterproof fabrics tolerate heat well, while others can warp, melt or lose their finish if treated incorrectly.
This guide explains how seam sealing works, which methods suit different projects and the mistakes worth avoiding before you start sewing.
Why Waterproof Fabric Seams Need Sealing
Waterproof fabric can lose its protective barrier where it has been stitched. Every needle hole creates a small opening that may allow water through under pressure or prolonged exposure.
This matters most on projects that face regular outdoor use or direct rain. A rain jacket, bike bag or garden furniture cover may perform well at first, but unsealed seams often become the weak point over time.
The fabric surface itself may repel water, but seams interrupt that continuous layer. Topstitching, bulky seam allowances and unnecessary pin holes can all increase the chance of moisture getting through.
Choosing a suitable waterproof fabric before sewing also makes the process easier. Some coated and laminated fabrics respond well to seam tape, while others are better suited to liquid sealants or minimal stitching techniques.
How Seams Affect the Performance of Waterproof Fabric
The more stitching, topstitching and pin holes a project has, the more opportunities water has to pass through.
Even carefully sewn seams can become vulnerable if the fabric is repeatedly pierced outside the seam allowance. Many sewists use clips instead of pins for this reason, especially on coated or laminated materials.
Projects with curved seams, shaped panels or decorative topstitching often need more attention during sealing because each row of stitching creates another path for moisture. This is especially important when sewing outdoor cushions, waterproof aprons, bags or breathable outerwear.
If your project needs flexibility as well as weather protection, then our Waterproof UV Resistant Outdoor Upholstery Fabric works well for outdoor cushions and furnishings where repeated folding and handling can stress sealed seams.
Fabric handling also matters. Stretching coated fabric during sewing can distort the seam, while bulky seam allowances may stop seam tape from bonding evenly.
If you are comparing materials for outerwear or practical outdoor sewing, it helps to understand how different coatings and finishes behave before cutting into your fabric.
Best Methods for Sealing Waterproof Fabric Seams
The main options are seam sealing tape, liquid seam sealant and specialist heat sealing, but the right choice depends on the fabric and project.
| Method | Best For | Points to Consider |
| Seam sealing tape | Rainwear, lightweight bags, some outdoor fabrics | Requires careful heat testing |
| Liquid seam sealant | Fabrics that may not tolerate ironing | Needs drying time and neat application |
| Heat sealing | Specialist technical fabrics | Not suitable for every coating or finish |
After choosing a sealing method, test it on a scrap before applying it to the finished project. This helps you check heat tolerance, residue and adhesion without risking the final piece.
Browse waterproof fabrics carefully before sewing, especially if your project needs flexibility, drape or repeated outdoor use.
Seam Sealing Tape
Seam sealing tape is one of the most common options for waterproof garments and lightweight outdoor sewing projects.
The tape is usually applied to the wrong side of the seam using controlled heat and pressure. Once bonded correctly, it helps cover the needle holes created during stitching.
This method can produce a neat finish with less mess than liquid sealants, but not every waterproof fabric can tolerate ironing or heat application. Some coatings may wrinkle, lift or melt if the temperature is too high.
Testing on a scrap first is essential, especially if you are working with laminated or coated fabrics.
Liquid Seam Sealant
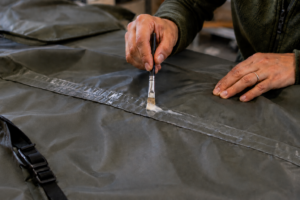
Liquid seam sealant is often safer for fabrics that react poorly to heat.
The sealant is brushed or squeezed along the stitched seam, where it fills needle holes and creates a flexible barrier once cured. This method is commonly used on outdoor covers, bags and practical utility projects.
Liquid products can leave residue or shine if overapplied, so careful placement matters. Drying times also vary between products, which means rushing the process can affect the final result.
Always check the sealant instructions alongside your fabric care guidance before use.
Heat Sealing
Heat sealing is more specialist and is usually associated with technical outdoor fabrics or commercial manufacturing methods.
Some waterproof materials can be bonded using heat rather than traditional stitching, but this approach requires careful temperature control and suitable equipment.
Too much heat can damage coatings, distort the fabric surface or weaken the waterproof finish. Unless your fabric supplier or product instructions specifically support this method, approach it cautiously and test thoroughly first.
Step-by-Step Guide to Sealing Seams on Waterproof Fabric
Seal waterproof seams by testing first, sewing carefully, applying the chosen sealant to the wrong side, then checking for leaks once dry or cooled.
1. Test a Fabric Scrap
Before sewing the main project, test your tape, sealant or heat setting on leftover fabric.
This helps you check:
- Heat tolerance
- Adhesion
- Surface changes
- Residue or shine
- Flexibility after sealing
Do not assume all waterproof fabric behaves the same way.
2. Sew Carefully
Try to minimise unnecessary holes during construction.
Helpful tools may include:
- Wonder clips instead of pins
- A microtex needle for cleaner stitching
- A seam roller
- A pressing cloth if ironing is permitted
Keep your stitching neat and avoid repeatedly unpicking seams where possible.
You may also find our guide to 10 tips for sewing with waterproof fabric useful before starting.
3. Apply the Sealant
Apply seam tape or liquid sealant to the wrong side of the seam where possible.
Work slowly and evenly. If using tape, follow the recommended heat settings carefully. If using liquid sealant, allow full drying or curing time before handling the project.
4. Test the Finished Seam
Once sealed, lightly test the seam using water spray or gentle exposure before relying on it outdoors.
Check:
- Stitch lines
- Corners
- Folded seams
- High-stress areas
This kind of home test can highlight obvious issues, but it does not guarantee professional waterproof performance in heavy weather conditions.
Mistakes to Avoid When Sealing Waterproof Fabric
The biggest mistakes are using too much heat, skipping the test piece, sealing the wrong side poorly and making unnecessary holes.
Other common issues include:
- Using standard pins outside the seam allowance
- Choosing tape that does not suit the fabric coating
- Rushing drying or curing time
- Pressing coated fabric directly with a hot iron
- Ignoring care instructions after sealing
Trying to fix problems after the project is complete is often harder than testing properly at the start.
How to Test Sealed Waterproof Seams
Test sealed seams gently with water before using the finished item in real conditions.
A simple spray test is often enough for home sewing projects. Spray the seam lightly, blot the underside and check whether moisture appears around the stitched areas.
You can also inspect seams after drying to look for lifting tape, cracking sealant or areas that may need touching up.
Outdoor projects such as garden cushions or storage covers may benefit from occasional retesting after repeated use or cleaning.
Maintaining Waterproof Fabric and Sealed Seams
Sealed seams last longer when the fabric is cleaned, stored and handled according to the fabric and sealant instructions.
Avoid assuming every waterproof fabric can be machine-washed or exposed to high heat. Some coatings may degrade over time if cleaned aggressively or folded while damp.
It also helps to:
- Store projects dry where possible
- Inspect seams after outdoor use
- Reapply sealant if wear appears
- Follow fabric-specific care guidance
Decorative outdoor projects such as garden cushions and seat pads can benefit from William Morris Printed Water Repellent Outdoor Canvas Fabric, where careful seam sealing helps maintain water resistance without affecting the printed finish.
If you are unsure which waterproof fabric suits your project, browse our range carefully and compare coatings, flexibility and intended use before sewing.
If you’re having a look through all of our collection, and still have any questions, then contact us at UK Fabrics Online to ensure you don’t waste a yard of material and that your projects come off with as little hassle as possible.
Leave a Reply